GrooveCraft: Building Your Own Amplifier for Next-Level Music Vibes
People have different preferences when it comes to how they like to listen to music, and the sound experience can be different for each person. Here, I’ve put together my findings on creating an affordable do-it-yourself sound system that suits my taste.
What Makes Sound Good?
Okay, so everyone’s got their own taste in sound. Some love the deep, thumping bass that makes your heart go boom. Others are into the high, sparkly notes that tingle your ears. Then there are folks who like adding cool effects, like digital magic or echoes. And, of course, some just want the original sound without any changes. It’s like picking your favorite flavor of music – everyone’s got their own sweet spot! 🎵🔊
Exploring Ways to Enhance Sound Quality.
1. Quality of Audio Data.
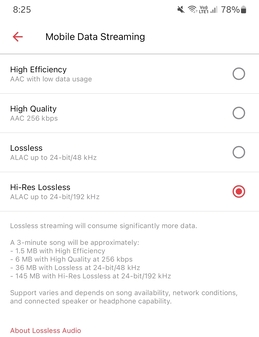
The sound you hear is like a digital superhero! It’s stored as digital data, kind of like a musical code. The best quality comes from something called lossless music data. It means the sound stays exactly as it was recorded – no changes. There are also cool codes like AAC and MP3, with more bits, higher sample rates, and deeper depths they can also shine. Honestly, my ears can’t catch the difference in AAC music beyond a sample rate of 48kHz, bit rate of ~256kbps, and depth of 24 bits. If you can, your ears might be super sensitive!
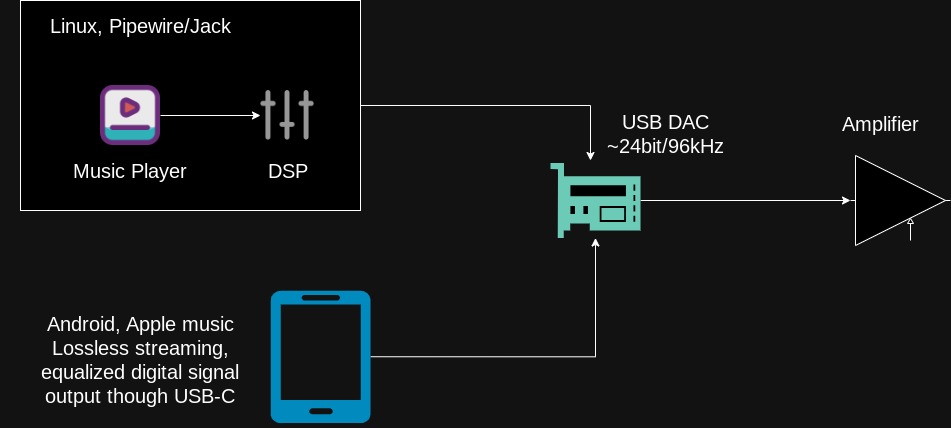
2. Media Players.
Choosing a music player is like picking the coolest DJ for your tunes. You’ve got a bunch of them for different operating systems. Each player uses its own algorithm for handling digital music data. Since I mostly roll with Linux and Android, my picks are Apple Music for Android (Loseless music streaming), for Linux Aqualung, Audacious, and Deadbeef. And on Windows, Windows Media Player is my top pick. 🎶✨
3. Supercharging Your Music: Digital Signal Processing Plugins (DSP Plugins).
Want to spice up your music experience? You can play around with some cool tools called Digital Signal Processing (DSP) plugins. The superstar among them is the Equalizer, letting you boost the frequencies you love. But there’s more to explore – plugins like surround, reverb, echo, harmonics, compressors, and even frequency filtering and cutoffs.
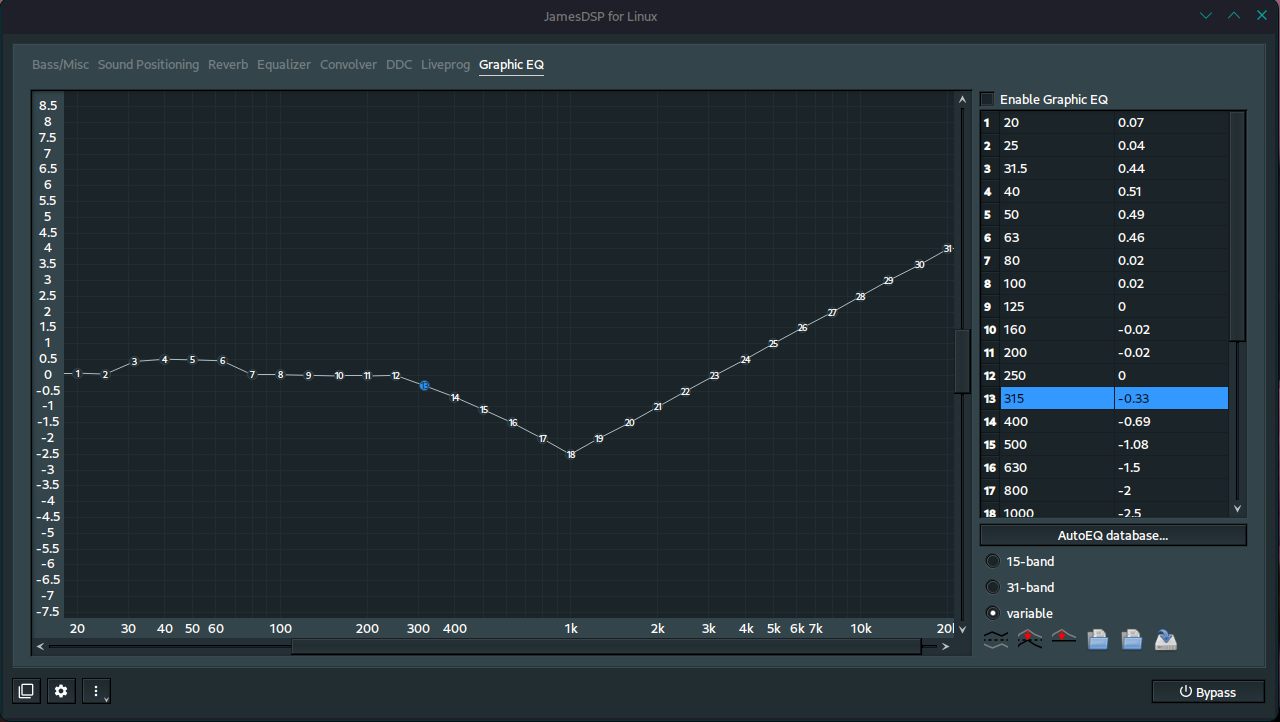
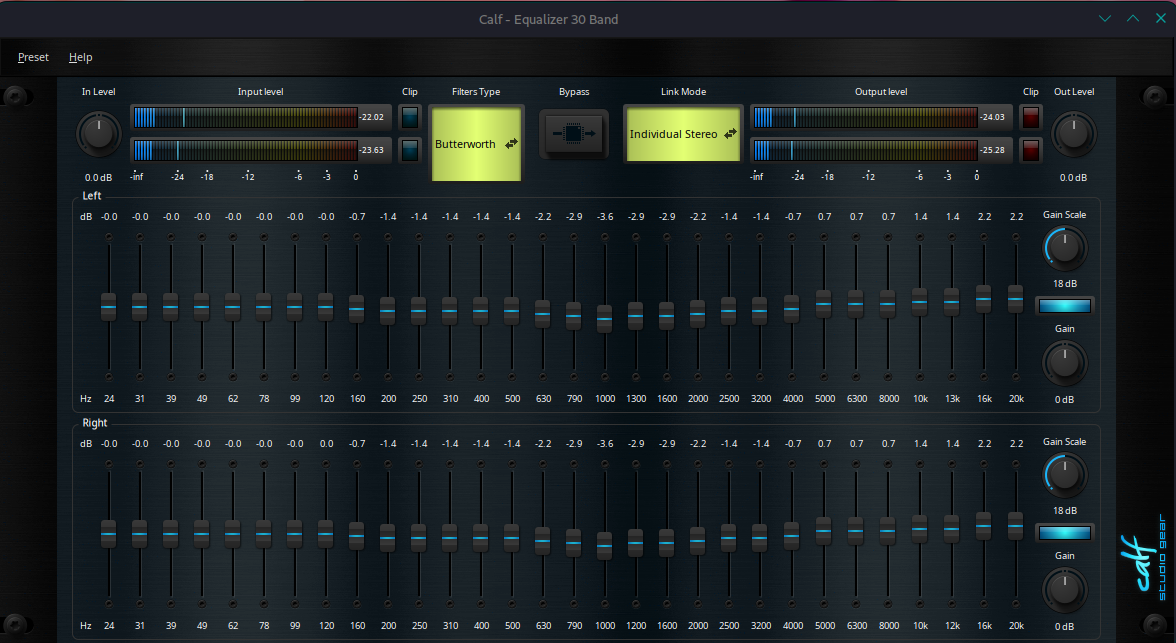
On Linux my go-to buddies are JamesDSP4Linux (a nifty pipewire DSP tool) and Calf Studio Gear (especially when using Jack2, mostly for line-in audio). I personally enjoy adding a bit of treble boost, lowering the mid-range a bit(1kHz as the low-lying), and keeping the bass reduced or flat for those low-frequency vibes. It is a modified “V” curved equalization effect with frequencies decreasing from 500Hz to around 4kHz. It’s a very pleasing tone for my ears! 🎶✨
-
JamesDSP4Linux
-
Calf studio gear
4. The DAC: Turning Digital to Analog.
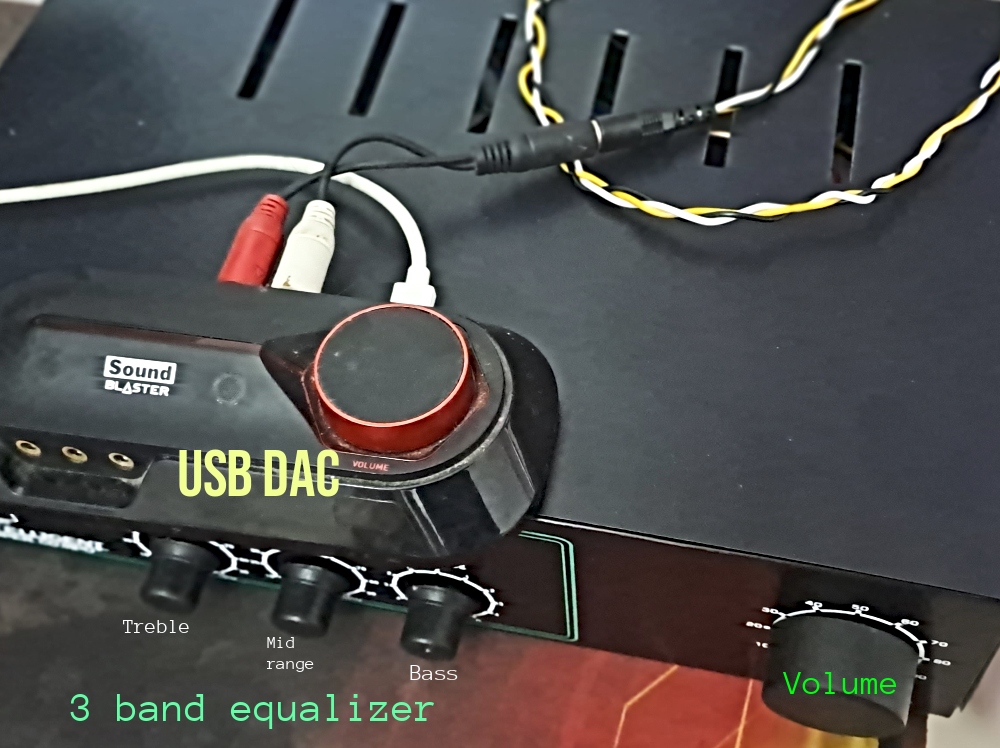
It’s a crucial gadget for turning the digital tunes into real analog sound. I went for a USB DAC from Creative Labs (Model SB1560, Omni Surround 5.1) in my setup. Despite being an older model, the output is impressively superior and clearer compared to other DACs I’ve experimented with, including those bundled with Realtek, CMedia like chips and other integrated/budget-friendly sound cards. 🎧✨
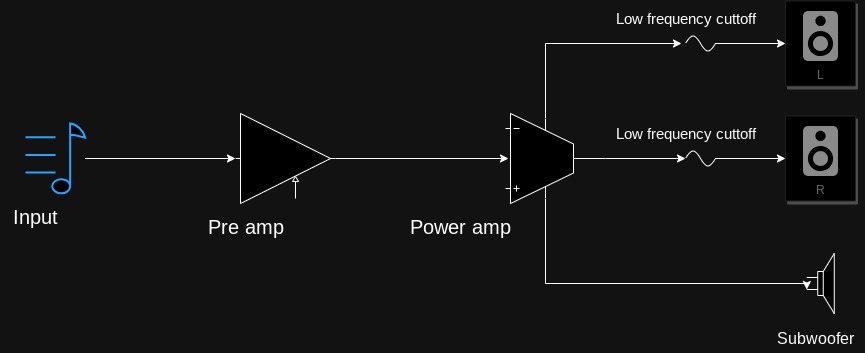
5. The Pre Amplifier: Pumping Up the DAC signal.
So, after the DAC finishes its digital-to-analog conversion, the preamplifier steps in. It grabs those signals from the DAC and boosts the electric signal from the DAC if needed, especially when receiving a weak signal. Now, the way it enhances audio can vary, thanks to the design of the preamp. Most preamp circuits come with a gain controller, bass level, treble level, and optionally, left and right channel balance or mid-range frequency adjustment controllers. Personally, I prefer sticking with three-band control parameters or none at all since I found it makes no sense to change the balance or signal level between left and right channels.
6. Power Amplifier - Electrify The Audio Signal.
The power amp takes the enhanced signal from the preamplifier and boosts it up big time. It’s the magic wand that cranks it up, increases the gain to make the signal stronger, and the sound louder.
7. Speakers: The Sound Performer.
Speakers need to be loud enough, cover a wide range of frequencies to capture every sound detail, and smoothly reproduce those frequencies. My preference is separate speakers for different frequency ranges. This is beneficial because bass frequencies can sometimes overpower the mids and highs at higher volumes when using only a full-range speaker, causing issues like Doppler distortion and draining power for bass.
Modern full-range speakers attempt to address these issues, but they can be a bit pricey. However, investing in quality performers is like having front-row seats to your favorite concert! 🎶✨
8. Speaker Positioning: Listening Zone Configuration.
How you place your speakers and set up your room can totally switch up how your ear catch those frequencies. The position of your speakers and the size of your room may change how you feel the music vibes.
For instance, if you tuck your bass buddy (woofer) in a room corner, get ready for some serious bass punch. But, be sneaky with those high-frequency speakers; if you cover them up, you might miss out on those crystal-clear notes you love.
Now, here’s my sweet spot: If I’ve got two cool bookshelf speakers, I’d pop them in front, one on the left and one on the right, just below ear level – it’s like the music is chatting right at me. And if there’s a subwoofer in the mix, I’d sneak it into the back corner of the room.
It’s like finding the perfect, comfortable spot to watch a movie!
9. Ultimately: Take Care of Your Ears
A rocking music system won’t do much if you forget about your ear health. Here are some simple tips that I follow to keep the listening ability tip-top:
- Dial Down the Volume: Keep the music vibe alive by lowering the volume for those marathon music sessions.
- Give Your Ears a Timeout: Treat your ears to some quiet time. Find a peaceful spot and let your ears recover from all that sound stimulation.
- Mix It Up: Surprise your ears! Explore different music genres and styles to keep things interesting.
- Stay Hydrated and Rest Well: Good health equals happy ears. Keep hydrated, catch some quality Zs – your body’s auditory system will thank you.
- Follow the 60/60 Rule: If you’re rocking headphones or earbuds, here’s a cool rule: take a break every 60 minutes, especially if the volume is cranked up past 60% of the maximum. Your ears deserve a breather!
10. Other Important Aspects of Sound Processing.
THD - Total Harmonic Distortion.
- Imagine a game: lower THD means your sound triumphs with less distortion.
- It’s the gauge of how much your sound might embark on a distortion adventure under different conditions.
SNR - Signal to Noise Ratio.
- Envision a superhero showdown: higher SNR means your signal is a superhero, warding off noise villains.
- It’s the measure of how much unwanted noise wants to sneak into your audio signal.
Electric Signal Distribution.
- The wires – the unsung heroes of the audio world!
- Using high-resistance wires is like sending your frequencies through a tricky maze. I go for wires with less than ~0.2 ohms resistance – smooth transfering of electric signals.
Amplifier Class
- Class A: The noble knight of low distortion, though not the most power-efficient.
- Class B: Efficient powerhouse, but watch out for the crossover distortion ninja.
- Class AB: Strikes a balance, reducing crossover distortion compared to its ninja cousin, Class B.
- Class C: The highly efficient speedster, perfect for less distortion-critical missions.
- Class D: The efficiency maestro, often found rocking out in portable audio devices.
- Class H: The zen master, balancing efficiency and distortion – the wise choice for professional audio amplifiers.
The Groovy DIY Fix! Enhancing The Analog Configuration.
I’ve already delved into selecting audio data, DSPs, and DACs above. Now, let’s dive into my adventure of deciphering the analog configuration for the audio.
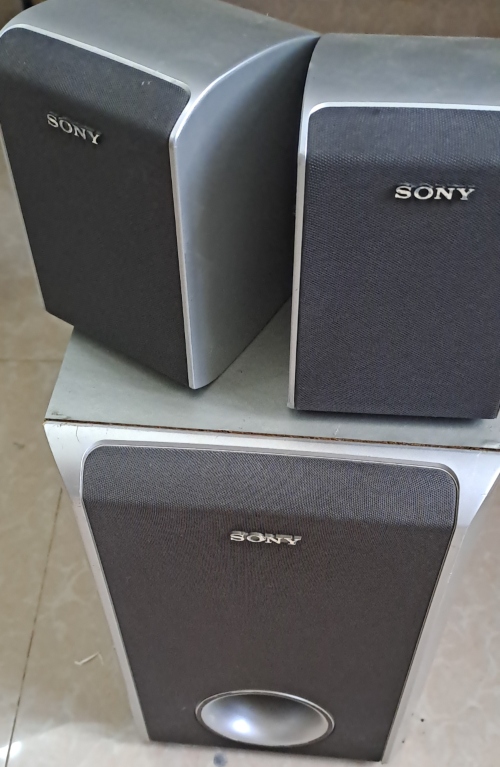
1. The Speakers.
I scored this awesome classic Sony 5.1 speaker set online for a steal! These older speakers are not just easy on the wallet but also deliver a super clear and lively sound, way better than those budget Chinese speakers flooding the market(no offence). But I prefer a simple stereo (2 channels or 2.1) sound vibe. No need for fancy 4.0, 5.1, or 7.1 setups. So, I decided to move ahead with just the front speakers (SS-TS31) and the subwoofer box (SS-WS31) from this set.
2. The Pre-Amplifier.
As a heavy metal enthusiast, finding the right preamp for my intense tunes was a challenge. The music is loud, aggressive, and the vocals are brutal. Here’s the scoop on the preamp setups I put to the test because most online reviews are based on user preferences.
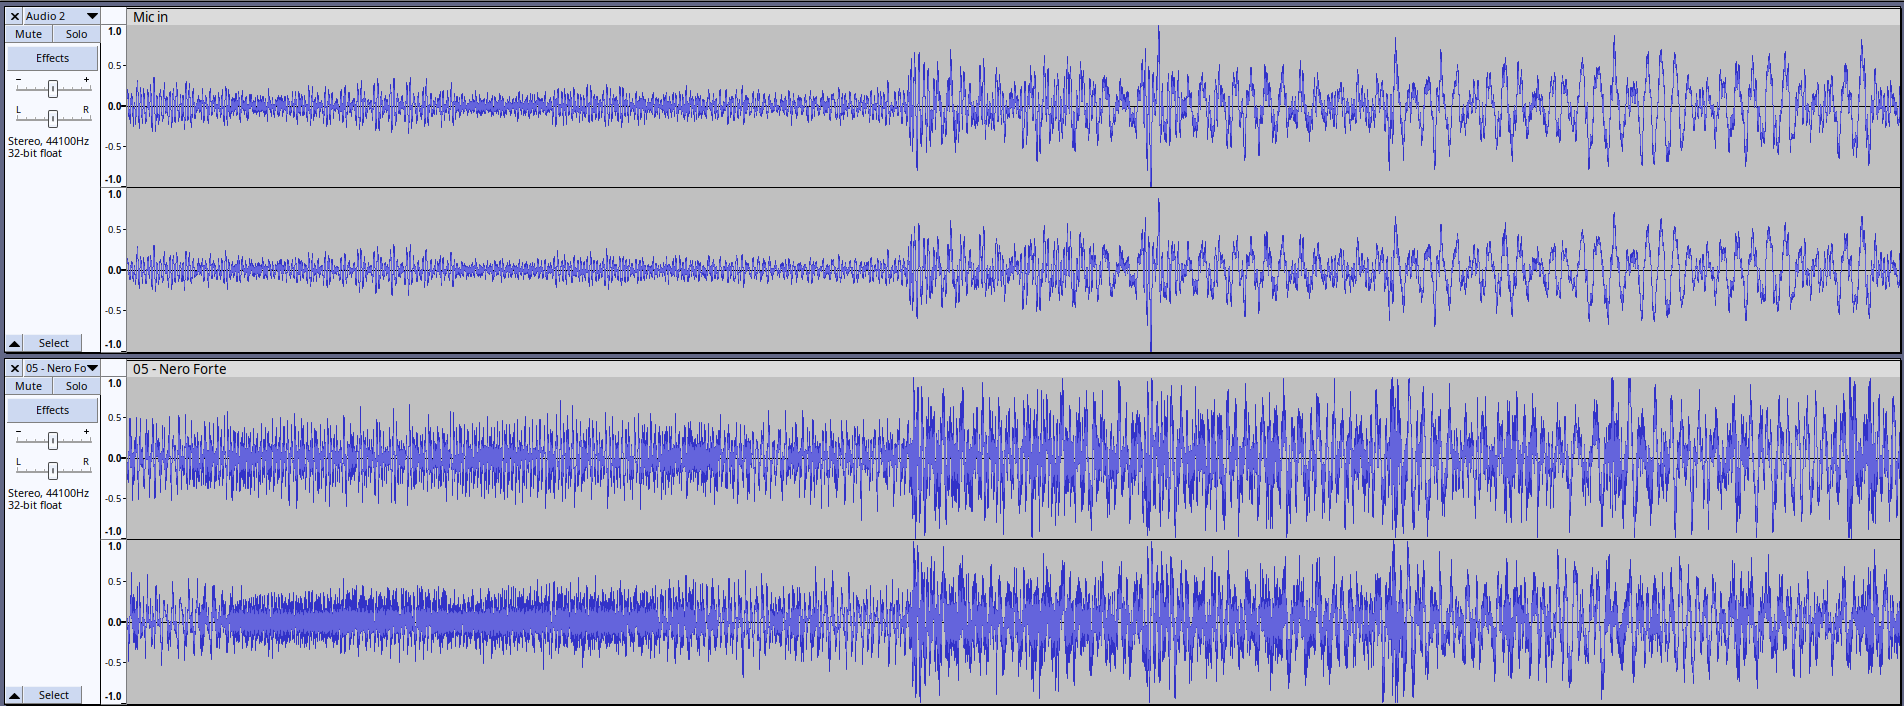
I used Audio Technica ATH-M20X headphones (not the best, but they deliver solid clear flat frequency) and lossless music playback to find the right one. Here’s the lowdown:
The Soundtrack of Judgment:
- Nero Forte by Slipknot: Pure metal chaos from start to finish. Heavy vocals, pounding beats.
- Blood, Tears, Dust by Lacuna Coil: Aggressive dual vocalists, aggressive melody – metal with a dramatic twist.
- Lost in the Echo by Linkin Park: An all-time favorite alternative rock song with electronic vibes.
- Blinding Lights by The Weeknd: Pop with a touch of heart in the accompaniments.
- Nothing Else Matters by Metallica: Need I say more?
- Interstellar Theme by Hans Zimmer: No words, just goosebumps.
The Pre-Amplifier Compilation:
While listening to the above songs, I took each circuit for a spin and rated them based on my metal standards. Some circuits I soldered myself, and some I grabbed already soldered(below pre-amplifier circuits are very much available, affordable and cheap). Your preferences might vary, so give them a shot!
| IC/Transistor | Score | Sound at Max Gain | Heavy Metal | Low-Noise Genres | Vocals Clarity | Accompaniment Clarity |
|---|---|---|---|---|---|---|
| LM324 | 12 | 2 | 2 | 3 | 2 | 3 |
| LM358 | 12 | 2 | 2 | 3 | 2 | 3 |
| NE5532 | 16 | 3 | 3 | 4 | 3 | 3 |
| TDA 1524A | 14 | 2 | 3 | 4 | 3 | 3 |
| UA741 | 12 | 2 | 2 | 3 | 2 | 3 |
| C945 | 17 | 4 | 3 | 4 | 3 | 3 |
- IC/Transistor: The brain of the preamp. Results may vary due to the overall circuit design, so experiment away!
- Sound at Maximum Gain: Cranked the preamp to the max. Let’s see what they got.
- Heavy Metal Music: Complicated, noisy music playback.
- Low Noisy Music: Everything else – pop, electronic, RnB, you name it.
- Vocals Clarity: Can I hear those guttural screams clearly?
- Accompaniment Clarity: The hidden gems – harmonics, rhythm guitars, electronic beats, etc.
Scores:
- 1: Useless.
- 2: Okay, some distortion at high volumes, but bearable.
- 3: Good, barely noticeable distortion when the gain is up.
- 4: Excellent, no crackles, no distortion, and no overlapping sounds.
Based on my research, I picked the pre-amplifier circuit with NE5532.
- It performs well on gain without adjusting or normalizing the frequency levels.
- Instead of balancing stereo channels (which makes no sense to me), it has a mid-range frequency controlling knob.
- No hiss sound until it is more than ~90% of the maximum gain level.
- No buzzing sounds even when the transformer is close by.
- It has good reviews on the internet.
3. The Power Amplifier.
Just like with pre-amplifiers, I explored amplifier chips and circuit setups to find the perfect match to power up the signal for my speakers. With a listening space of about 144 sqft, I aimed for an amplifier delivering 20 to 100 watts, ideal for my Sony speakers with a 3-ohm impedance and a ~130 watts rating (not exceeding 4 ohms and 50 watts per channel, keeping it safe). Since I roll with a 2.1 speaker setup, I needed a 3-channel amplification output.
Amplifier Configurations
To configure the 3-channel output, I utilized multiple pre-amplifiers with band controls. Here’s the breakdown:
- NE5532 for Left/Right Channels:
- Set the bass knob to 0, eliminating the need for a high pass filter.
- TDA 1524A for Subwoofer Channel:
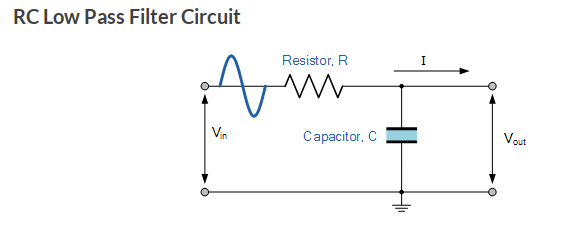
- Turned the treble knob to 0, complemented by a passive low pass filter with a resistor and capacitor, restricting subwoofer output up to ~300Hz.
1. Ripped-off Circuit from Microlab M100 Subwoofer System (Class - Probably D):
- Integrated speaker quality was terrible, lacking bass and high frequencies.
- Performed decently with Sony speakers.
- Used NE5532 pre-amplifier only as this circuit is already 2.1.
- Moved on due to insufficient power.
2. Stereo LA4440 + Mono LA4440 (Class - AB, Felt More Like Class B):
- A classic amplifier design.
- Sound resembled an old radio.
- Quickly moved on.
3. Mono Channel TDA2005 x 3 (Class - AB, The Hot Plate):
- TDA 2005 is obsolete but available.
- Unpleasant sound with no clarity.
- ICs heated up excessively, even burning my finger accidentally.
- Chips eventually exploded with smoke.
- Probably low-quality replicas.
4. Stereo TDA2030A + Mono TDA2030A (Class - AB, Better Than Nothing!):
- Also obsolete but available.
- Good sound profile, slight crackling at high gain levels.
- Did not heat like TDA2005.
- Likely high-quality replicas per online reviews.
- Unsatisfied with high-frequency clarity, moved on.
5. Stereo LM1875 + Mono LM1875 (Class AB, Finally a Good Player!):
- Tested Texas Instrument’s substitute for TDA 5-pin IC.
- Replaced TDA2030s with LM1875 in existing circuits.
- Very good sound quality, better than TDA2030A.
- Slight sound crackling at higher gain levels.
- ICs heated up more than TDA2030A.
- Subwoofer channel frequently shut down in longer listening sessions, likely due to integrated thermal protection.
- Decided to move on without adding a larger radiator.
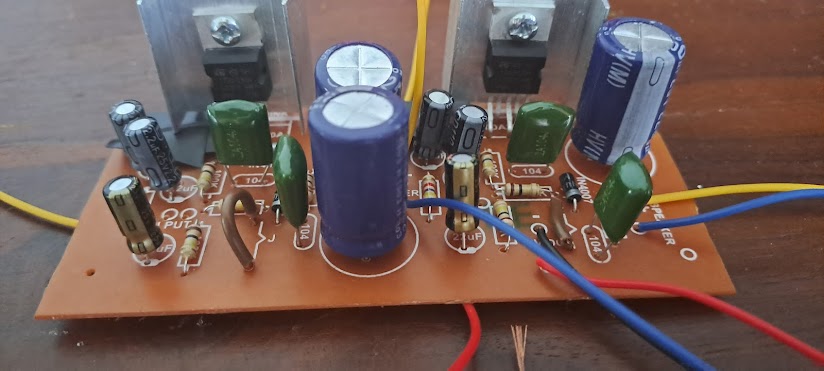
6. Dual TPA3116D2, 2.1 Circuit (Class D, An All-Inclusive Hero to the Rescue):
- Tried another plug-and-play circuit, also from Texas Instruments with excellent reviews.
- Efficient, higher sound level even at ear-piercing high frequencies and heart-attack-level bass, yet the radiator barely got warm or stayed cool.
- No complaints about sound quality; remarkable clarity for a small circuit.
- Lower THD, integrated speaker guard, and wider operating voltage range were added advantages.
- Sealed the deal with this amplifier.
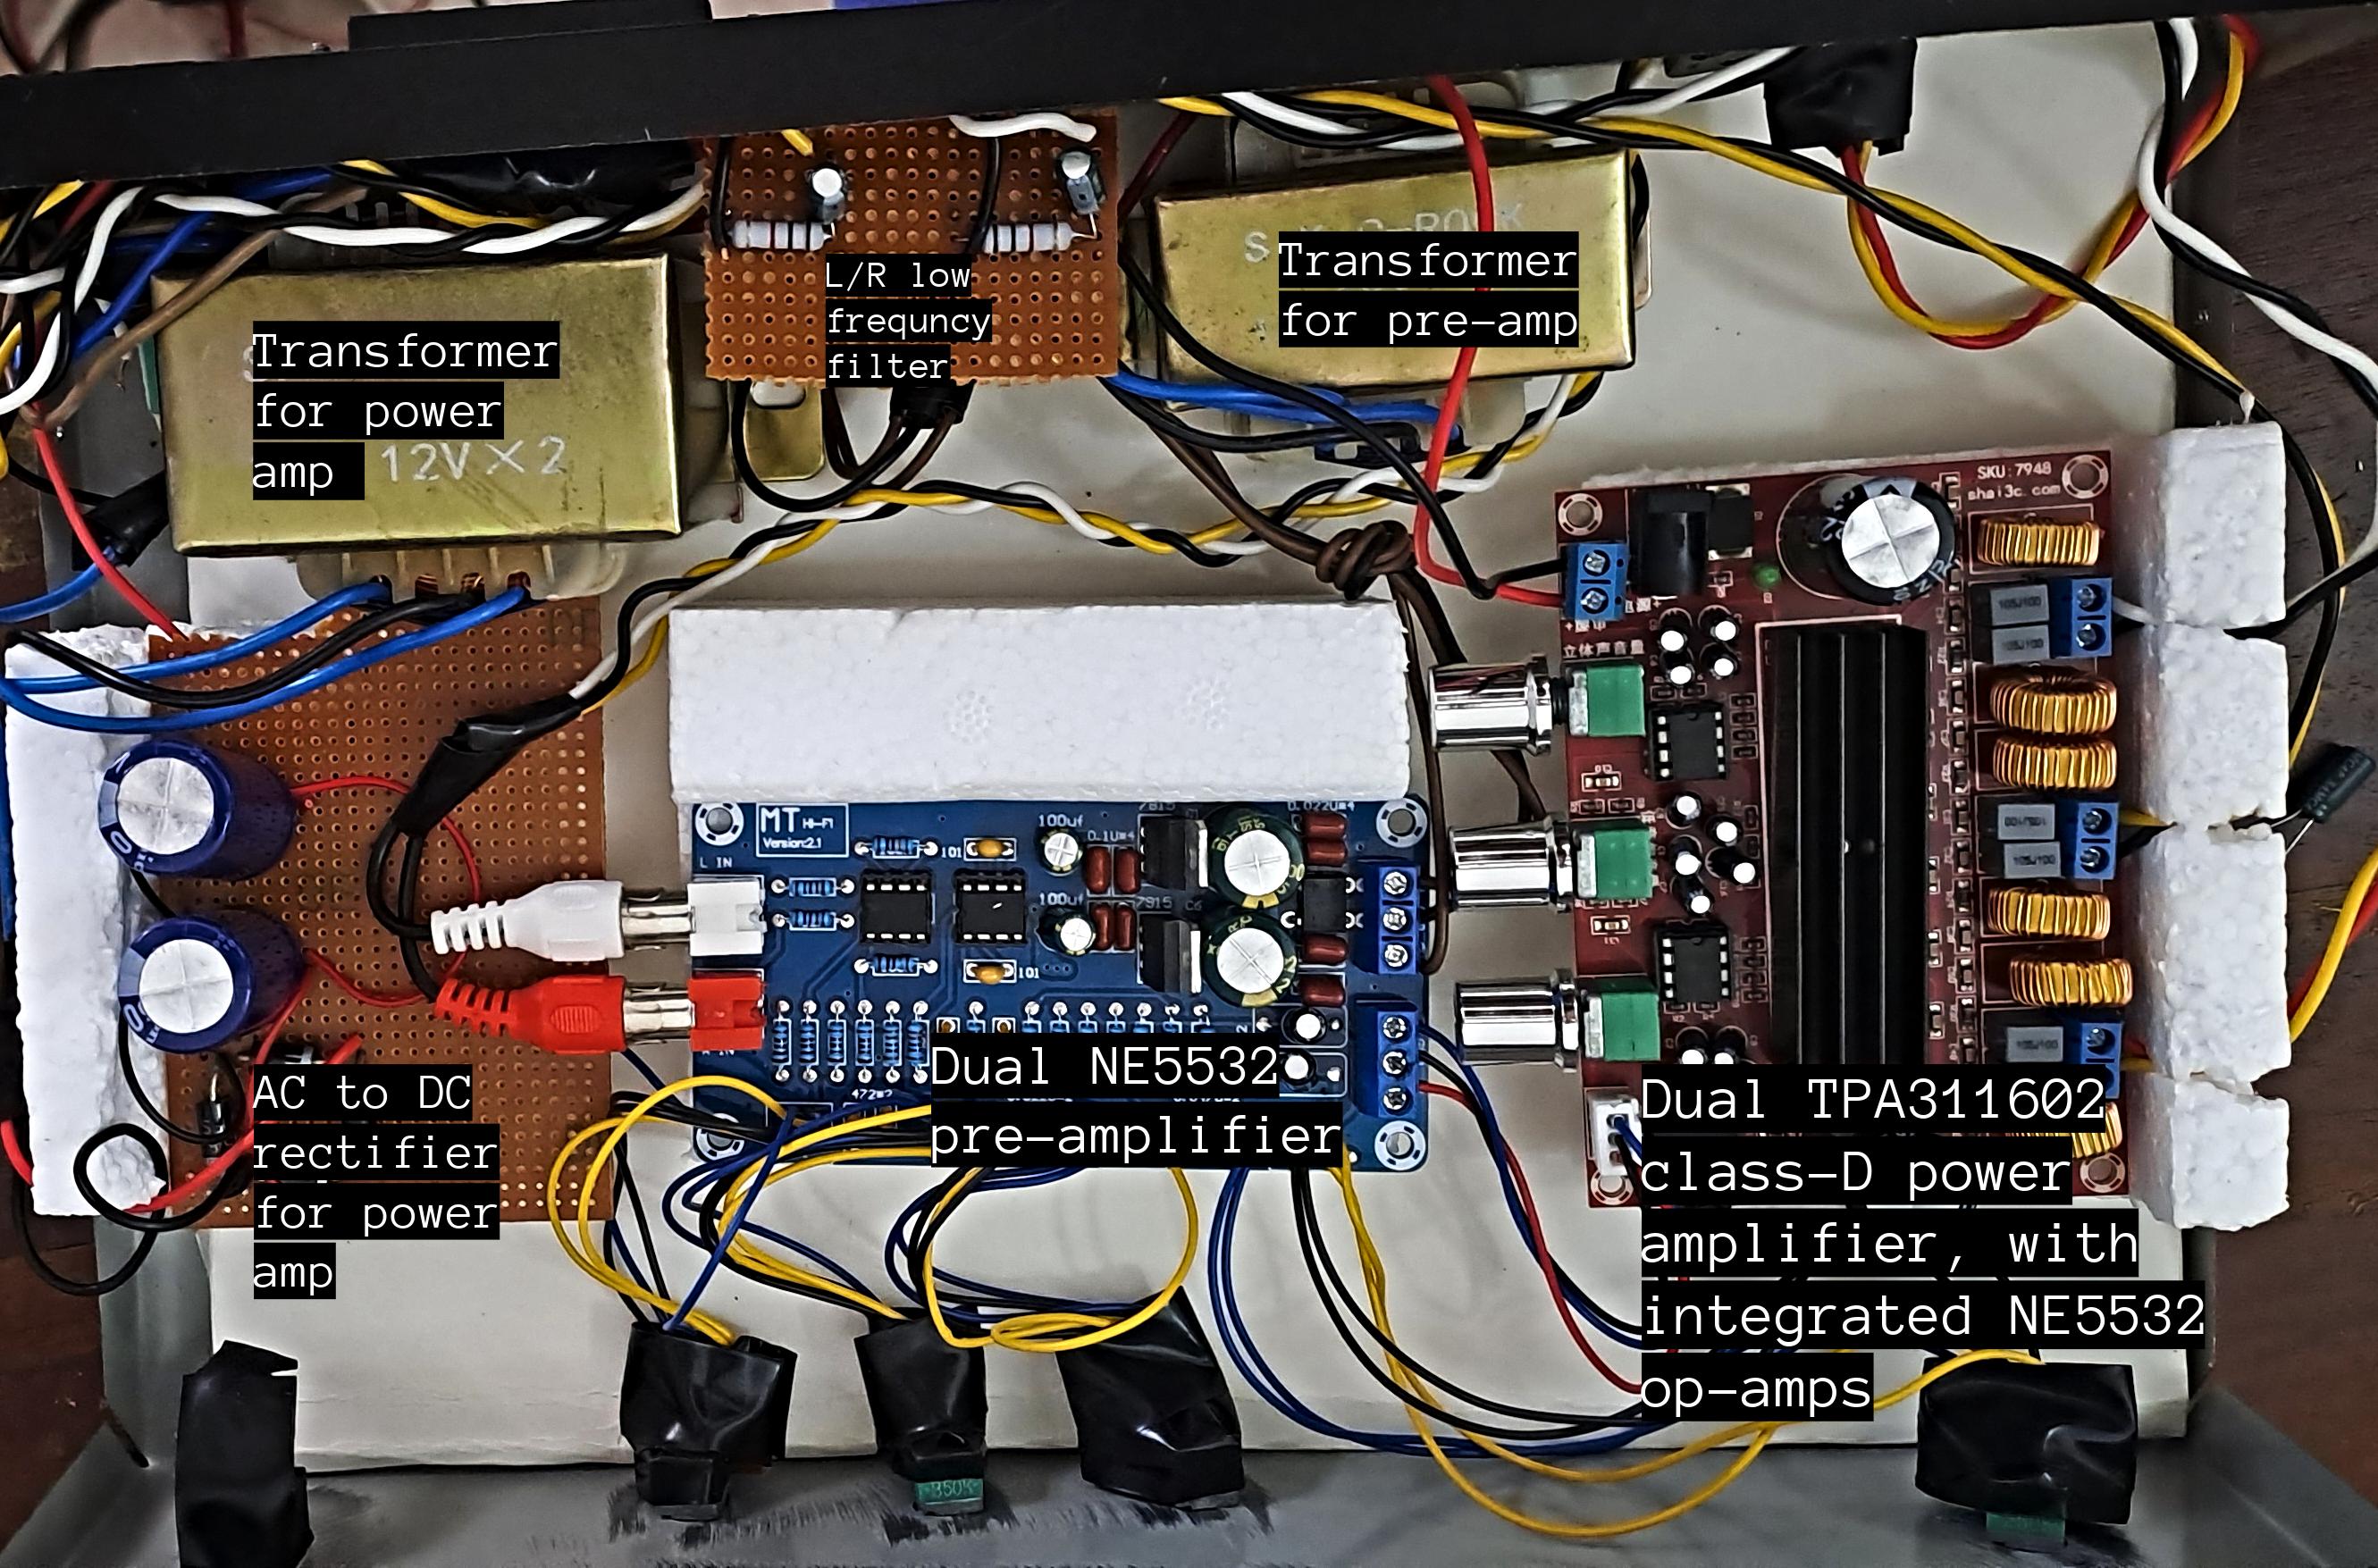
Please disregard the unsightly black tapes; they’re there due to my phobia and past experiences with circuit-roasting short circuits. 😂
I removed the passive L/R high pass circuits from the above design as they masked the high frequencies I desired, regardless of the values I used for the capacitor and resistor according to the formula fc = 1/2πRC.
Final Conclusion
Considering all the research and money spent, I could have bought a decent off-the-shelf speaker system. But where’s the fun in that? 😎
Comments powered by Disqus.